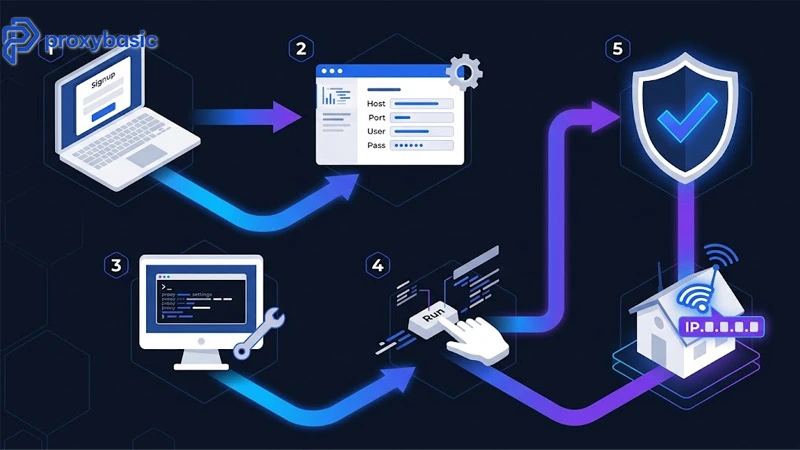
This residential proxy tutorial walks you through everything from choosing a provider to making your first proxied request. If you’ve never used a residential proxy before, you’ll have a working setup by the end. If you’re switching providers or moving from datacenter proxies, the same steps apply.
What You Will Learn in This Tutorial
By the end of this guide, you will be able to:
- Choose and sign up for a residential proxy provider
- Read and understand your proxy credentials
- Make your first proxied request in Python, Node.js, and cURL
- Configure rotating vs sticky sessions
- Verify your setup is working with an IP check
- Avoid the most common beginner mistakes
Step 1: Choose and Sign Up for a Proxy Provider
Free vs Paid Residential Proxies
Free residential proxies almost always fail in practice. Free proxy lists are public , they’ve been used by thousands of others, and most are already blocked by the time you try them. They also lack the session control and geo-targeting needed for real use cases.
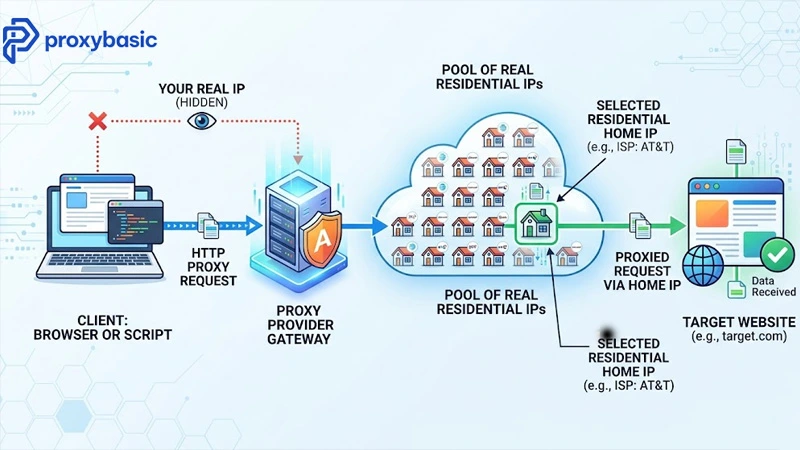
Paid residential proxies give you access to a maintained pool of real residential IPs with rotation, geo-targeting, and session management. Most providers offer starter plans or pay-as-you-go billing, so you can test without a large upfront commitment.
For this tutorial, any of these work well for beginners:
- Decodo (ex Smartproxy) , clean interface, good documentation, free trial available
- Webshare , has a free tier (10 proxies) good for testing
- IPRoyal , affordable starter plans, straightforward setup
Sign up and choose the smallest plan or free tier to start.
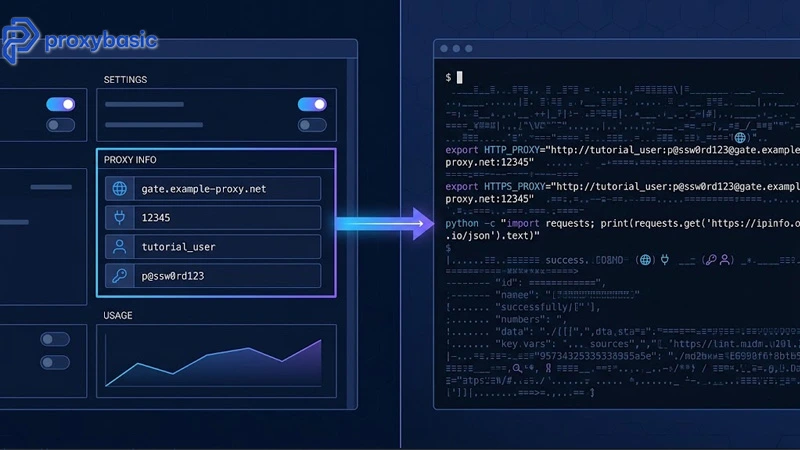
What Your Proxy Dashboard Looks Like
After signing up, your dashboard typically shows:
- Proxy endpoint (gateway host): something like gate.provider.com
- Port: usually 7000, 10000, or 9999
- Username: your account username (sometimes auto-generated)
- Password: your account password or API key
Some providers also show a usage graph (GB used vs plan limit) and a location selector for geo-targeting.
Write down your credentials , you’ll need them in the next step.
Step 2: Get Your Proxy Credentials
Understanding the Proxy Endpoint Format
Residential proxies use the standard HTTP proxy format:
http://USERNAME:PASSWORD@GATEWAY_HOST:PORT
Example:
http://user123:[email protected]:7000
With geo-targeting parameters (added to the username):
http://user123-country-US:[email protected]:7000
http://user123-country-US-city-Chicago:[email protected]:7000
With a sticky session (same IP held across multiple requests):
http://user123-session-mysession001:[email protected]:7000
The parameters go inside the username field, separated by hyphens. The exact format varies by provider , always check the provider’s documentation for their specific format.
Step 3: Make Your First Proxied Request
Using Python (requests library)
First, make sure requests is installed:
pip install requests
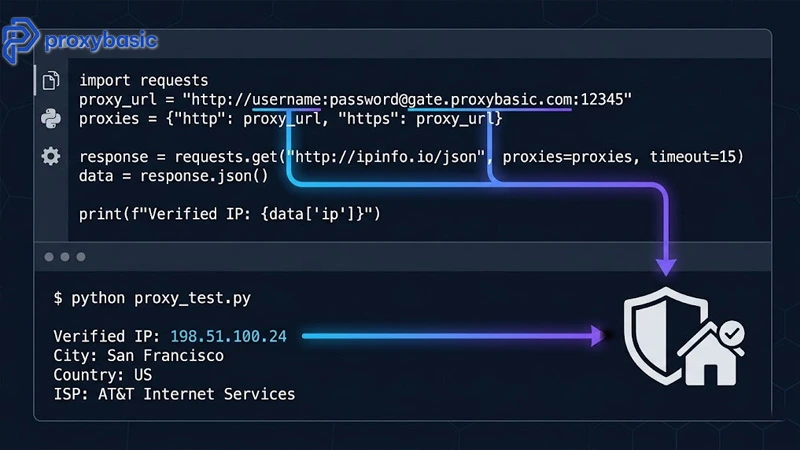
Now make a proxied request and print the IP it uses:
import requests
proxy_url = “http://YOUR_USERNAME:[email protected]:PORT”
proxies = {
“http”: proxy_url,
“https”: proxy_url,
}
response = requests.get(“https://ipinfo.io/json”, proxies=proxies, timeout=15)
data = response.json()
print(f”IP: {data[‘ip’]}”)
print(f”City: {data[‘city’]}”)
print(f”Country: {data[‘country’]}”)
print(f”ISP: {data[‘org’]}”)
Expected output:
IP: 185.241.xx.xx
City: New York
Country: US
ISP: AS7922 Comcast Cable Communications
The ISP line should show a real internet provider (Comcast, AT&T, BT, etc.) , not a hosting company. If you see AWS, DigitalOcean, or similar, the proxy is routing through a datacenter, not a residential connection.
Using Node.js (axios)
Install the required packages:
npm install axios https-proxy-agent
Make a proxied request:
const axios = require(‘axios’);
const { HttpsProxyAgent } = require(‘https-proxy-agent’);
const proxyUrl = ‘http://YOUR_USERNAME:[email protected]:PORT’;
const agent = new HttpsProxyAgent(proxyUrl);
async function checkMyIp() {
try {
const response = await axios.get(‘https://ipinfo.io/json’, {
httpsAgent: agent,
timeout: 15000,
});
const data = response.data;
console.log(‘IP:’, data.ip);
console.log(‘City:’, data.city);
console.log(‘ISP:’, data.org);
} catch (error) {
console.error(‘Error:’, error.message);
}
}
checkMyIp();
Using cURL in Terminal
curl -x “http://YOUR_USERNAME:[email protected]:PORT” \
https://ipinfo.io/json
With geo-targeting for a US IP:
curl -x “http://YOUR_USERNAME-country-US:[email protected]:PORT” \
https://ipinfo.io/json
Step 4: Configure Rotation and Sticky Sessions
Rotating (default) , a new IP is assigned on every request. No extra configuration needed. Just make multiple requests and each one will come from a different IP.
Test rotation with this Python loop:
import requests
proxy_template = “http://YOUR_USERNAME:[email protected]:PORT”
proxies = {“https”: proxy_template}
for i in range(5):
r = requests.get(“https://ipinfo.io/ip”, proxies=proxies)
print(f”Request {i+1}: {r.text.strip()}”)
Each request should return a different IP address.
Sticky session , same IP held across multiple requests. Add a session ID to your username:
import requests
# **All requests with this session ID use the same IP**
SESSION_ID = “tutorial_session_001”
proxy_url = f”http://YOUR_USERNAME-session-{SESSION_ID}:[email protected]:PORT”
proxies = {“https”: proxy_url}
for i in range(3):
r = requests.get(“https://ipinfo.io/ip”, proxies=proxies)
print(f”Request {i+1}: {r.text.strip()}”)
# **All 3 requests return the same IP**
Step 5: Test and Verify Your Setup
Checking IP and Location
Run the full IP check from Step 3. Verify:
- The IP is different from your real IP
- The ISP shows a residential internet provider, not a hosting company
- The city/country matches your geo-targeting setting (if you set one)

Speed Benchmarking
Residential proxies are slower than direct connections. Typical latency: 200-800ms for US residential IPs. Test it:
import requests, time
proxy_url = “http://YOUR_USERNAME:[email protected]:PORT”
proxies = {“https”: proxy_url}
times = []
for i in range(5):
start = time.time()
requests.get(“https://httpbin.org/ip”, proxies=proxies, timeout=20)
elapsed = (time.time() – start) * 1000
times.append(elapsed)
print(f”Request {i+1}: {elapsed:.0f}ms”)
print(f”\nAverage latency: {sum(times)/len(times):.0f}ms”)
If average latency is above 2000ms, try a different proxy endpoint or check if your provider has a closer server to your location.
Common Beginner Mistakes
Using the same session ID for multiple different accounts , session IDs create IP consistency. If two different accounts use the same session ID, they share an IP and get linked. Use unique session IDs per account.Not adding geo-targeting , without a country parameter, you may get IPs from unexpected locations. Always specify country-US (or your target) when location matters for your use case.Setting timeouts too short , residential proxies can take 500-1500ms to connect. A 5-second timeout will cause frequent failures. Set timeouts to 15-30 seconds.
Forgetting to test before production , always verify your proxy with an IP check before using it for a real task. A mis-typed credential or wrong endpoint fails silently on some setups.Using rotating sessions for account logins , if you’re logging into any account through a proxy, use a sticky session. A rotating IP mid-login triggers security alerts on most platforms.
Conclusion
You now have a working residential proxy setup. The full process: sign up for a provider, get your gateway credentials, plug them into your Python/Node.js/cURL client, verify the IP is residential and geo-correct, and configure sticky or rotating sessions based on your use case.
From here, you can scale up to larger proxy pools, add geo-targeting for specific regions, and build rotation logic around your scraping or automation workflow.
Visit ProxyBasic for residential proxy plans with step-by-step setup guides for all major use cases.